Rough Country 3 Dodge Bolt on Lift Kit Review
Talk to a Ram Enthusiast
1-888-706-1096
M-F 8:30A-11P, Sat-Sun viii:30A-9P
-
 Store Ram 1500 Select Year
 - Change Vehicle
- View Customer Builds
Rough Country 3-Inch Bolt-On Break Elevator Kit (12-18 4WD RAM 1500 w/o Air Ride)
Item R102760

Telephone call a Ram Enthusiast at 1-888-706-1096
Yard-F eight:30A-11P, Sabbatum-Sun 8:30A-9P
Frequently Bought Together
-
Supreme Suspensions 1.50-Inch Pro Barracks Cycle Spacers; Set of Iv (12-18 RAM 1500)
$269.95

Video Review & Installation
Hey, guys, Adam hither with americantrucks.com. And today, we're taking a closer look at and installing the Rough State 3-Inch Bolt-On Pause Lift Kit, fitting all '12 to 'eighteen Iv-Wheel-Drive RAM 1500s without Air Ride. Y'all should exist checking this kit out if yous're interested in accomplishing three things, reduce mill rake while lifting the forepart and rear of your truck, fit larger wheels and tires on your truck up to 35 inches, and become additional basis clearance up forepart and at the rear to assist with some calorie-free off-road situations. This kit from Rough Land here lifts the front end three inches and the rear 1 inch and includes upper command arms to adapt the new lift angle. First and foremost, fitting larger wheels and tires on your RAM isn't too hard. Off the factory line, this generation comes with anywhere from xxx-inch to 33-inch all-season tires. Ours has mill 33s. Now, if you lot're looking to fit up to 35s comfortably, then you lot'll need a leveling or lift kit similar this one hither. The rear is no problem, but 3 inches is more than enough forepart stop lift to aid with adding up to 35-inch tires without modification. With some of the more aggressive mud-terrain tires, you may experience some slight rubbing at full turns depending on your wheel outset, only fitting up to 35s is absolutely achievable every bit yous can see on our '14 RAM here. When it comes to leveling out your truck'due south appearance by reducing the factory rake, a three-inch front and 1-inch rear lift kit like this from Crude Country does just that. If you're not familiar with the term rake, just know it'due south basically your truck's front end sitting lower than the rear in order to help with towing and hauling.You're well-nigh eliminating that rake with this kit here while lifting the entire truck up in the process. While you are lifting the entire truck, you lot're lifting the front more than than the rear to level it out. Getting additional basis clearance is also easily attainable with a leveling kit like this. Since you're lifting your entire truck up a couple of inches, you'll exist able to drive correct on over some of the smaller obstacles that yous otherwise may have come in contact with in the front or the rear. The stock front bumper and lip sits pretty depression, so any additional height can brand the difference with those smaller hazards on and off-route. This item kit from Rough Country is laser-cutting steel with black powder-coated finishes on top to assist with corrosion and rust resistance. The front lift is achieved with a strut top spacer that measures in at about one-inch, and a preload spring spacer that measures in at about 2 inches. The preload spacer sits under the strut chapeau on height of the spring and pre-compresses or preloads the bound. This causes a slightly sportier and tighter front end ride. Those spacers along with the change in break geometry results in the 3-inch front lift. The rear spacers of grade are a one to one ratio, so this is a one-inch spacer for the rear. Because the 3-inch lift changes the suspension geometry a scrap, your manufactory ball joints are going to exist under a niggling bit more stress. This kit prevents that by upgrading to stronger tubular upper control arms with upgraded brawl joints for greater wheel joint and meliorate downwardly suspension travel. For right around 550 bucks, you tin can selection this kid up here, which is going to ameliorate the appearance of your truck and the functionality to help with fitment. For simply $50 more, however, y'all can get the same kit, but with as well upgraded premium N3 shocks for better ride quality, just something to keep in heed.The installation for the lift kit similar this comes in at iii out of three wrenches on our difficulty meter. You lot'll need some specialty tools like a spring compressor to get the job done, and it'll accept three to four hours from start to finish. If you don't have experience or feel comfortable tackling information technology yourself, in that location's no shame of handing it over to a professional to get washed properly. Continue in mind, yous'll need to go an alignment in one case everything is said and done, and be sure to torque everything back down to factory spec if you're tackling information technology yourself. I'chiliad going to walk you lot through the whole process. Let's get started. Tools used in this install, and keep in mind, guys, it may vary per vehicle, nosotros use an air bear upon gun and a cordless impact, variety of ratchets and extensions, a multifariousness of sockets, mainly a total socket set, including an viii, 13 deep socket and swivel socket, 14, 15, 16, 17, 18 brusk and deep sockets, 19, 21, 22, xv/16ths deep sockets, forth with the universal swivels recommended for a i/2-inch, an 8-millimeter hex socket or Allen fundamental, a variety of wrench sets including a 15/16ths, eighteen, and nineteen-millimeter. Nosotros also used a variety of ratcheting wrenches, include a 14, fifteen, 18, 17, and 19-millimeter, variety of screwdrivers like this flat-head here, dead accident mallet along with a hammer, a variety of pry bars is recommended, and a variety of specialty tools. All right. To kicking things off, I'yard gonna show you guys how to uninstall your factory strut here on our forepart driver side. Now, of course, you want to get your wheel out of the way, that'south pace number one. We're supported on a lift, but if you're working on a floor and make certain you lot have a floor jack properly supporting the weight of the vehicle. Moving on from there, we'll have to disconnect the ABS lines from the knuckle and from the brake line itself, simply to make sure that when the knuckle drops down out of the upper control arm, nosotros're not putting too much stress on those brake lines.All right. Then, for this ABS line, just follow it downward to the back of your knuckle here that's connected with a plastic clip. I'k just going to jerk that back and forth until information technology pops upwardly. At present, you desire to follow that guy up to the top here, that connect to your brake line. That, you're merely going to pull apart just like that. At present, we accept more than slack on our restriction lines, and so we're not putting tension on them. Next up, catch a 16-millimeter deep socket and we're going to remove the manufacturing plant nut off of our sway bar end link. All correct. Set that aside. All right. Next up, nosotros're going to disconnect our necktie rod end. Now, earlier we get started, you desire to know that this is a 21-millimeter nut. At present, in some cases, if you use an impact gun on this, the entire stud volition spin in that ball joint. You may need a 10-millimeter socket and a 21-millimeter wrench to go the nut off while holding that stud steady. For our commencement fourth dimension, I'm going to utilize our 21-millimeter deep socket in my air gun to get this guy off. All right. So, ours didn't give us whatsoever trouble, just that is still worth noting. At present, before I have this guy out, I'm actually going to leave it in and just put that nut a couple of threads on just to go on the unabridged hub associates from rotating while tackling the upper command arm. All right. So, next, we're going to do the upper control arm to the knuckle. Now, RAM uses a castle nut here, which has these open gaps all the way around, and through one of the gaps going the stud itself is a metal retaining pin. I'm gonna use a needle-nose pliers to pull that pin straight out. All right. Set that aside. At present, for this, I'g gonna use an 18-millimeter ratcheting wrench. I highly recommend picking up a ready of ratcheting wrenches for this install. There'southward a lot of different aspects of this that ratcheting wrenches will be a lot easier to employ.So, one time we bankrupt that loose, I tin can dorsum this of with my mitt. Now, big affair to call up is we take to dislodge the brawl joint from the knuckle. You tin see this stud didn't pause free with that. So, I'thousand going to leave this nut on a couple of threads, we're going to grab our hammer, and we're going to swing and tap against here to dislodge that, and then we'll use a pry bar to pull information technology downward and have our nut off. Now, for this, you desire to grab a brawl-peen hammer and we're going to tap correct up against the side here of the knuckle. With that dislodged, you'll run into that the upper command arm moves freely in there. Allow's take our nut off and it comes with that larger spacer. One time you lot have the castle nut and spacer out, set up those aside. All right. So, from here, we can go dorsum to the necktie rod end, take that nut off, elevator the tire rod end out. And I like to hang information technology upward over that sway bar terminate link, and then put our nut back on the stud merely and so we don't lose it. Here, we can lift the upper control arm out of the knuckle. Now, what I like to do is merely grab the upper control arm castle nut and thread it right back on again so nosotros don't lose information technology, just similar the tie rod end. All correct. Side by side upwardly, nosotros're going to tackle the bottom strut commodities belongings it to the lower control arm. Now, the nut here, I'm going to utilise a 15/16ths deep socket on my impact gun, and I'm going to employ a 21-millimeter wrench to hold the bolt head on the within. At this point, you can catch a brawl-peen hammer and just tap the stop of that to popular it through. Some cases, you may be able to pull information technology straight out. If non, you can take hold of a flat-head screwdriver and simply stick it in there and hammer the back end of that. All right. So, now, we can focus on the top iii strut tower nuts. I'll take hold of a 15-millimeter wrench, and I'one thousand going to use once more the fifteen-millimeter ratcheting wrench. Once more, this really comes in handy. We're going to loosen upwardly these three top nut.All correct. Then, now, our strut is free. I'thousand gonna use a pry bar here betwixt the lower command arm and the strut body at the bottom to pry this guy out of position. All right. So, next up, nosotros're at our jump compressor. Nosotros take to put our preload spacer right underneath of the strut top chapeau and on acme of the ringlet jump. At present, I've got this setup on our compressor already. If yous're not familiar with spring compressors, there's definitely no shame handing this over to a professional person shop because this can be pretty dangerous if you don't have it washed properly. We're basically gonna accept the tension off of the bottom leap seat by compressing the spring so that we can have our elevation hat off. With that spring compressed, nosotros'll be able to loosen up that nut without it bursting off. So, you want to make certain you lot're exercising extreme caution, and and then you're going to offset compressing your spring. All right. Once yous accept that spring compressed, and you lot can run into that coming off the bottom there, nosotros can grab our 18 socket and get that nut off the top. All right. Then, occasionally, you'll have problem getting this nut off, and the reason existence is information technology'll just spin the unabridged rod inside the strut. If that is the case, then y'all need some specialty tools. I have an open-ended ratchet with an xviii socket on at that place, and the open-ended ratchet will allow me to put an 8-millimeter deep socket with an extension through information technology, to hold the stud in place. So, that fashion, we can just piece of work this guy off without the stud completely rotating every time.All right. Once you have that cracked loose, bring that strut downwardly, and we can first decompressing that spring. So, basically, what we're going to exercise is lift off that top hat, leave the isolator, and the preload spacer's gonna sit on top of the isolator and under the strut hat right here. All right. So, I'k but going to put that preload spacer there, follow information technology upwardly with our height hat, just like that. At present, nosotros have to adjust our spring compressor for the new height departure. Then, I'm going to bring our pillars upward, brand sure that this is going to seat properly, and we can start compressing again. All right. And so, you lot're going to feed your struck up through, line upward the bottom spacer, and encounter how much threading we demand. We need a lot of thread, which means we've got to compress the spring quite a bit. All right. Now, nosotros can put our nut back on the top. So, in that location you have it with the preload spacer. Now, nosotros can caput dorsum to the truck and put our top spacer on. All right. Now, when it comes to assembling all of the studs onto your new spacers, you're going to demand something like a vise. Now, we have pressed in studs, and then they're a little different than some of the other kids out there. Basically, what we're going to have to exercise is put this guy in our vise. I'm gonna put information technology so that the pigsty is on the top here and so it'south easily attainable. All right. Then, we're going to grip that guy right in there. At present, what you want to look for are the holes where the pressed in stud just barely fit in. That's the one that nosotros're going to be looking at there. So, basically, what I'thousand gonna exercise here is put ane in, I'm going to showtime threading it as much as I can past hand. We're but going to thread that hole just and so we accept a piddling scrap of thread on the other side. I'g going to take one of the nuts, thread it on the back here, and nosotros're going to apply that nut to help pull the stud through.So, catch a 15 socket and start tightening that guy down, and it's going to slowly pull the stud back through. All right. So, yous can meet that stud getting shorter and shorter on this side. So, once you have it all the manner down to the knurled end, the pressed in stud terminate, what we're gonna do is accept dead blow hammer, and I'm just going to apply this fat i/2-inch extension to help just tap it through just a little bit. All right. That's just going to assist grip it. So, now I'thou gonna utilize an touch on gun, I'm gonna tighten downward that nut, and it's going to pull the pressed in stud all the way through.
Subscribe: New Ram videos daily!
Subscribe to our YouTube Channel
Product Information
Features, Clarification, Reviews, Q&A, Specs & Installation
Features
- Lifts the Front end by 3 Inches and Rear by i Inch
- Increases Footing Clearance So You Can Drive Off-Road
- Features Tubular Upper Control Arms
- Improves Range of Motion of Brawl-Joints
- Front end and Rear Spacers Level the Lift
- Rubber Bushings Make for Immovability
- Accommodates upwards to 35" Tires
- Bolt-On Installation
- Lifetime Manufacturer Warranty
- Fits 2012 to 2018 4WD Dodge Ram 1500, Excluding TRX
Description
Become Ready for Off-Route Adventure. Sure, you lot can take your RAM 1500 off-roading equally-is. The trouble is, you lot may be riding too close to the ground to not get stuck or tear up your rig's underside. This Rough Country iii in. No Cutting Lift Kit offers an piece of cake solution. It'southward the simplest elevator kit out at that place, merely also highly-effective.
Smart Upper Arm Blueprint. The surreptitious to the success of this lift kit is its tubular upper command artillery. The control arms are fabricated of high-quality materials and are smartly tailored for easy alignment adjustments. They piece of work well with your rig to increase the range of movement of ball joints.
Highly-Durable Make. The upper command arms of this elevator kit are built to last. The kit too includes Clevite condom bushings for the arms for longevity and immovability. Strong forepart and rear spacers likewise support a level wait and bulldoze from front to back.
Straightforward Installation. If you lot've been avoiding lift kits because they audio complicated, this kit is a groovy choice. It is designed as a bolt-on installation. Cutting and other complications aren't required.
Warranty. Rough Land offers a lifetime replacement warranty on this lift kit. See the manufacturer data for more details.
Awarding. This Crude Country three in. No Cut Lift Kit is designed to be used on the 2012-2018 4WD RAM 1500s without Manufacturing plant Air Ride Break. The Lift Kit is not compatible on TRX models.
Shop All 3 to 5 Inch Truck Lift Kits
Shop All Truck Parts And Accessories
Shop All Truck Lift Kits
Fitment:
- 2012 Dodge Ram 1500
- 2013 Contrivance Ram 1500
- 2014 Dodge Ram 1500
- 2015 Contrivance Ram 1500
- 2016 Dodge Ram 1500
- 2017 Dodge Ram 1500
- 2018 Dodge Ram 1500
Details
Rough Country 31200
CA Residents:  Alarm: Cancer and Reproductive Harm - www.P65Warnings.ca.gov
Installation & What's in the Box
Installation Info
Installation Time
(approx) iv Hours
Difficulty Level:
Mechanical expertise or professional installation required.
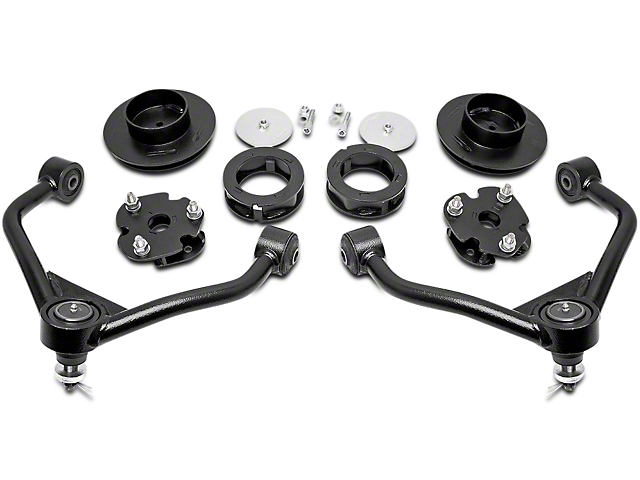
What's in the Box
- (2) Upper Control Arms
- (2) Strut Preload Spacers
- (two) Strut Spacers
- (2) Rear Coil Spacers
- Hardware for Installation
Tech Specs
4.6
Customer Reviews (nineteen)
Questions & Answers
Will It Fit My Ram 1500
- 3.0L V6 EcoDiesel - 14, 15, 16, 17, 18
- iii.6L V6 - 13, 14, 15, 16, 17, 18
- 4.7L V8 - 12, 13
- 5.7L V8 - 12, thirteen, xiv, 15, 16, 17, xviii
The Lift Kit is not uniform on models equipped with Factory Air Ride Suspension
Check if this fits your exact Vehicle aboveGive-and-take on the Trail
Using paypal checkout was piece of cake and quick. I really like the fact that all of the searches are tailored to find the items that volition work with my truck, instead of having to look though a bunch of equipment I can non use.
Meet Our Squad

Josh R'due south, Graphite Metallic '03 Ram 1500 Customer Service Supervisor
When I was a kid I spent every summer attending car shows with my granddad. We would oft run into street rods, and musculus cars getting pulled over past local constabulary on the side of the road. We would coil the windows down and yell "Is it a HEMI?!". I e'er had a fascination with the legendary HEMI ...
Source: https://www.americantrucks.com/rough-country-3-no-cut-lift-kit-1217-4wd-w-o-air-ride-excluding-trx.html
0 Response to "Rough Country 3 Dodge Bolt on Lift Kit Review"
Postar um comentário